Square to Round on Pipe flat pattern
What it is
The square to round on a pipe is the transition whose rectangular opening straddles a horizontal pipe and whose round opening sits on top: the inlet over a screw conveyor, the tank nozzle and the silo outlet. The sides along the pipe stay straight and the ones across it become arcs of its section, so the part is not the flat-based square to round: the two faces over the arcs are curved, and each corner meets the round opening at a different point.
Where it is used
Inlets and outlets of tubular screw conveyors; openings on horizontal silos, tanks and hoppers; dust and air pick-ups on a round header; joining a round duct to a larger pipe through a rectangular opening.
Measurements the calculation needs
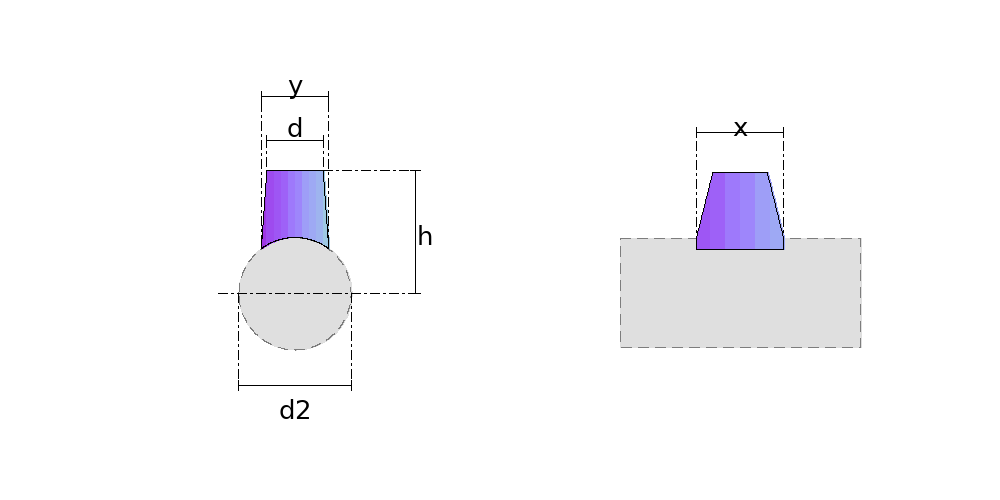
- D2 Pipe outside diameter
- X Side X of the rectangular opening (along the pipe)
- Y Side Y of the rectangular opening (across the pipe)
- D Round opening diameter
- H Height (from the pipe axis to the round opening)
- DV Divisions
- THK Thickness
- MO Fit on the pipe
- V Branch offset across the pipe
- EX Round opening offset in X
- EY Round opening offset in Y
- RC Corner radius of the rectangular opening (0 is a sharp corner; half a side, oval)
- NP Number of sheets
Calculate with your own measurements
No account needed: enter the measurements in millimetres or inches and get the figures and the drawing. The scaled PDF template, the DXF for the cutting table and the 3D model take a free account.
Diameters and sides are outside measurements. The flat pattern already allows for the plate thickness, working on the mean line.
Units: mm inches
How it develops: the formulas
- The bottom opening, on the mean line
a = (X − t)/2 ; b = (Y − t)/2 ; z(y) = √(R² − y²)R is the radius of the pipe face the transition sits on: D2/2, or D2/2 − t set in. The sides along the pipe lie at height z(b), and the ones across it are arcs of radius R. In the example (D2 500, X 400, Y 300, 3 mm plate): a = 198.5, b = 148.5, the corners 201.1 mm from the axis and the crown at 250.- The arc of each Y side
L = 2 × R × asin(b / R)It is the bottom edge of each Y side on the sheet. In the example, L = 500 × asin(0.594) = 318.0 mm, and the whole bottom edge measures 2 × 397 + 2 × 318.0 = 1430.0 mm.- The plane condition
P′(u) · ( Q′(s) × (Q(s) − P(u)) ) = 0P(u) is the point on the arc and Q(s) the one on the round opening. The line from each point of the arc goes to the point of the opening where both tangents and the line lie in one plane, and that is what makes the face develop without stretching. In the example, the corner meets the opening 12.78° from the middle of the Y side.- True length of a line
ℓ = √( Δx² + Δy² + Δz² )From the bottom point to the top one, as on the square to round; the round opening moves in half the thickness along the normal of the wall. In the example, the seam measures 309.2 mm and the corner line 377.5 mm.
Worked example
The values the form comes pre-filled with, run through the tool itself:
| Pipe outside diameter | 500 mm |
|---|---|
| Side X of the rectangular opening (along the pipe) | 400 mm |
| Side Y of the rectangular opening (across the pipe) | 300 mm |
| Round opening diameter | 250 mm |
| Height (from the pipe axis to the round opening) | 550 mm |
| Divisions | 16 |
| Thickness | 3 mm |
| Fit on the pipe | Set-on (on top of the hole) |
| Branch offset across the pipe | 0 mm |
| Round opening offset in X | 0 mm |
| Round opening offset in Y | 0 mm |
| Corner radius of the rectangular opening (0 is a sharp corner; half a side, oval) | 0 mm |
| Number of sheets | One sheet (the whole piece) |
| The flat pattern fits a plate of | 906 × 830 mm |
Result of the example
| Plate | 906 × 830 mm |
|---|---|
| Area and weight | 0.37 m² · ≈ 8.6 kg in 3 mm steel |
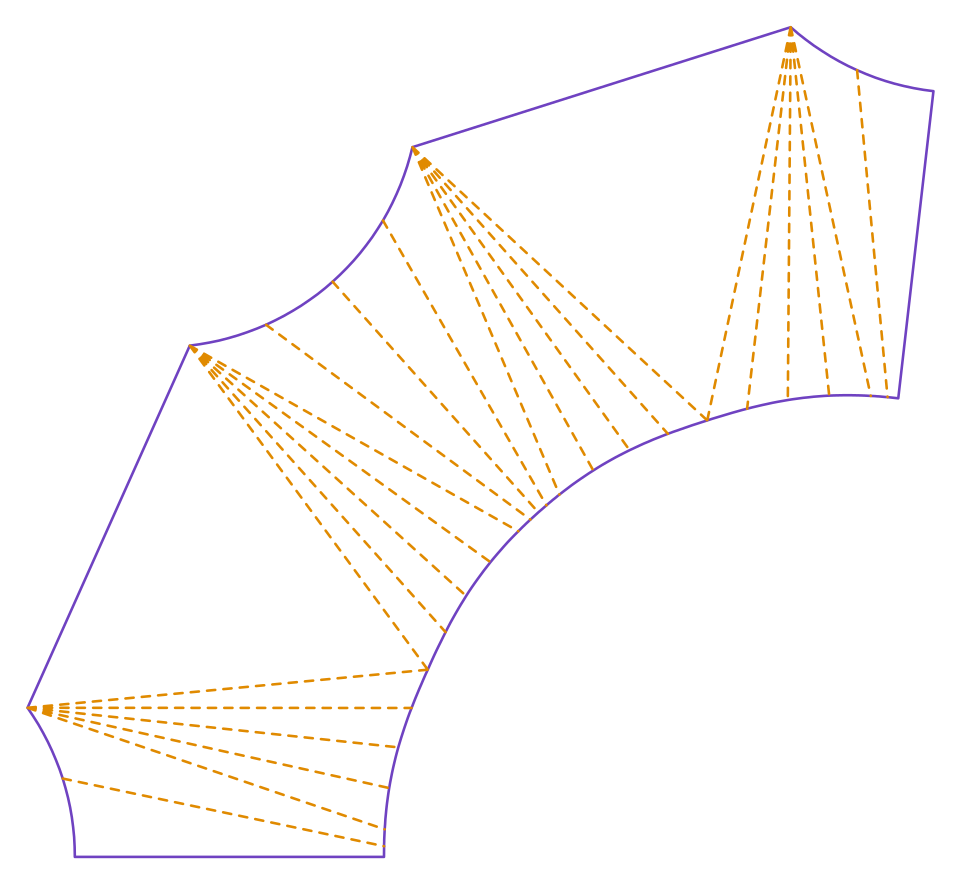
| Arc radii | 258.1 mm · 261.9 mm · 371.3 mm · 391 mm · 440.5 mm · 468.1 mm · 787.5 mm |
| Sector angle | 17.7 · 17.4 · 6.4 · 6.1 · 5.4 · 2.1 · 3° |
Assembly notes
The faces along the pipe are flat; the corners and the two sides over the pipe's arcs are curved: bend them in steps along their fold lines until the bottom edge sits on the pipe all the way round. In one sheet, the seam is at the middle of the side that crosses the pipe, on its crown. On a wide, low piece the end of each arc goes all to the tangent point of the round opening, and the corner gets a crease against the flat face: it is the fold that joins the corner to the top point.
SET-ON fit: the mouth is cut for the branch to sit on the outside face, and the hole goes by its inside diameter. Use the same fit on the part with the hole.
How to mark it out on the plate
- Divide each arc on the pipe into equal parts and the quarter of the round opening at each corner, and work out the lines, or read the fold lines from the calculator's table.
- Start at the seam, in the middle of the Y side, over the crown of the pipe: mark the line there.
- Build the half face over the arc in triangles -- the developed arc below, the opening above and the lines between --, then carry on through the corner fan, the flat face of the X side and the rest of the way round.
- Join the points of both openings with a flexible rule, since both are curved on the sheet; cut, bend the fans and the faces over the arc in steps at the fold lines, and check the bottom edge sitting on the pipe before welding the seam.
Common mistakes and tolerances
- Using the flat-based square to round
- With a flat base, the bottom edge of the Y sides comes out straight, at Y, and the part does not sit on the pipe: the rise of the arc is left open at the middle of the side, 50 mm in the example.
- Joining the whole arc to the tangent point
- This is the textbook construction: the face over the arc becomes a cone with its apex at the top point. It develops, but it leaves a crease from the corner to that point, 13.8° in the example, and the face does not meet the fan beside it.
- Measuring the height from the crown
- The height here is from the pipe axis. Measured from the crown, the part comes out taller by the whole radius of the pipe.
Frequently asked questions
- Where is the height measured from?
- From the pipe axis to the round opening, as on the rectangular tap on pipe: it is the one measure that does not change along the bottom opening, which rises and falls with the pipe. In the example, 550 mm on a 500 pipe: the round opening is 300 mm above the crown and 350 mm above the corners.
- How are sides X and Y measured?
- From above and outside, like the duct opening: X along the pipe axis and Y across it, smaller than the pipe diameter. On the sheet, the bottom edge of each Y side is the arc it takes up on the pipe, not Y: 318.0 mm in the example, against the 297 of the mean line seen from above.
- What hole do I cut in the pipe?
- The one on the shell with rectangular hole, with the same X and Y and the same fit. Around the pipe the hole measures the arc, not Y: 321.8 mm outside in the example, instead of 300. Set on, the transition sits on the outside face of the pipe; set in, it goes through the wall to the inside face.
- Why are the faces over the pipe not flat triangles?
- Because their bottom edge is an arc. The textbook joins the whole arc to the tangent point of the round opening, as a cone, and that develops, but it leaves a crease from the corner to the top point: 13.8° in the example. Here each point of the arc goes to the point of the opening where both tangents and the line between them lie in one plane, and the face meets the corner fan with no crease. On a very large pipe the arc becomes straight and the part is the square to round again.
- Can the branch or the round opening be offset?
- Yes, in the three offset fields: the branch across the pipe, for an off-centre outlet or a tangential entry; and the round opening over the rectangular one, along and across the pipe. The round opening has to fit inside the rectangle seen from above.
- Can it come out in more than one sheet? And with rounded corners?
- Two or four sheets, in the Number of sheets field: the seams fall at the middle of the sides that cross the pipe and, in four, also at the middle of the flat faces. Centred, the parts are alike and one template comes out; offset, one per part. The corner radius rounds the rectangular opening seen from above, as on a round-cornered duct: the corner becomes a curved strip with no crease, and the hole in the pipe takes the same radius. With the radius at half a side, the opening is oval; at both halves, round seen from above. On a wide, low piece, where the corner would only meet the round opening past the tangent point, the end of the arc goes all to that point, as a cone, and the corner takes one more fold.
You can work out the figures right here, with no account. PDF, DXF, 3D and history take an account — free, with unlimited calculations.