Conduit bending calculator: offsets, saddles and 90s
1:1 template and DXF
What it is
Conduit is marked straight and bent on a hand bender: the offset that moves the run to a parallel plane, the 3-point or 4-point saddle over an obstruction, and the 90° stub-up with the back-to-back. The page gives every mark measured from the end of the conduit, from the multiplier, the shrink and the take-up in the bender's table, draws the marked conduit and shows the finished bend in 3D.
Where it is used
Exposed EMT and rigid conduit runs: an offset into a box, around a beam or tight to a wall; a saddle over a pipe, a duct or another conduit; a 90 to turn up or down a wall; and the U between two walls or two joists.
Measurements the calculation needs
- EL Conduit size
- TB Bend
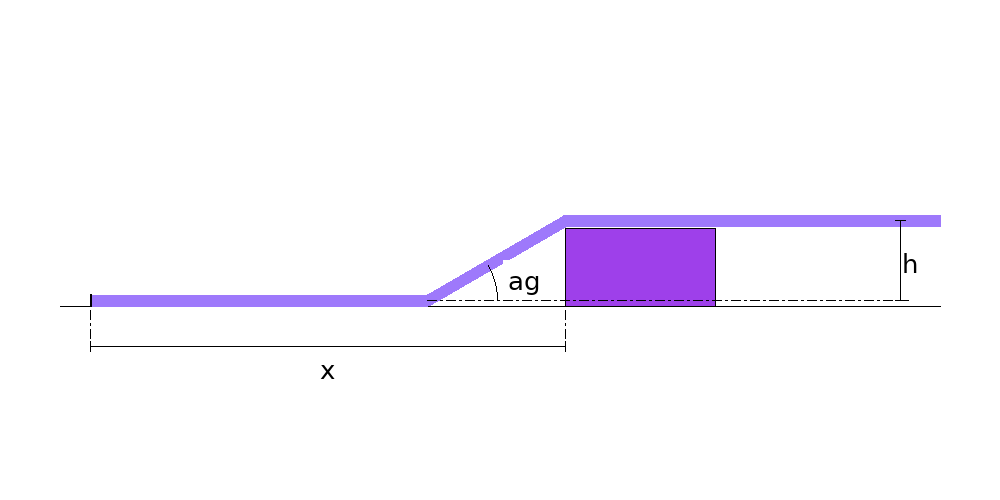
- AG Bend angle
- H Offset depth, obstruction height or stub height
- X From the end of the conduit to the obstruction (to its centre, for a 3-point saddle)
- W Obstruction width (4-point saddle) or back-to-back (0 = stub only)
Calculate with your own measurements
No account needed: enter the measurements in millimetres or inches and get the figures and the drawing. The scaled PDF template, the DXF for the cutting table and the 3D model take a free account.
Diameters and sides are outside measurements. The flat pattern already allows for the plate thickness, working on the mean line.
Units: mm inches
How it develops: the formulas
- Offset
between marks = depth × multiplier ; 1st mark = distance + depth × shrinkMultiplier and shrink from the bender table. A 6" offset at 30°: 6 × 2 = 12" between the marks, and the first one at the distance plus 6 × 1/4 = 1-1/2".- 3-point saddle
centre = distance + height × 3/16 ; outer marks = centre ± height × 2.5With a 45° middle and 22.5° outer bends; with a 60° middle, 1/4 and 2.- 4-point saddle
2nd = distance + height × shrink ; 1st = 2nd − height × mult ; 3rd = 2nd + width ; 4th = 3rd + height × multTwo offsets: one up before the obstruction and one down after it.- 90° stub-up
mark = stub height − take-upThe take-up is the bender's: 5" on 1/2" EMT.
Worked example
The values the form comes pre-filled with, run through the tool itself:
| Conduit size | 1/2" EMT |
|---|---|
| Bend | Offset |
| Bend angle | 30° |
| Offset depth, obstruction height or stub height | 6" |
| From the end of the conduit to the obstruction (to its centre, for a 3-point saddle) | 35" |
| Obstruction width (4-point saddle) or back-to-back (0 = stub only) | 0" |
| The flat pattern fits a plate of | 46-1/2" × 11/16" |
Result of the example
| Plate | 46-1/2" × 11/16" |
|---|

Assembly notes
1/2" EMT bender: 5" take-up on a 90° and a 4" centreline bend radius, the NEC minimum for a one-shot bender. The numbers are the manufacturer's table; check the ones cast on your bender head.
6" offset with two 30° bends. First mark 36-1/2" from the end: 35" to the obstruction plus 1-1/2" of shrink (6" × 1/4). Second mark 12" back from the first, 24-1/2" from the end (6" × 2).
Put the bender arrow on the first mark, hook facing away from the second, and bend to 30°. Roll the conduit half a turn, put the arrow on the second mark and bend to 30° again, in the same plane: the two straight runs end up parallel, 6" apart.
How to mark it out on the plate
- Choose the bend, the conduit size and, for an offset or a 4-point saddle, the angle.
- Measure the offset depth or the obstruction height and the distance from the end of the conduit to the obstruction -- to its centre, for a 3-point saddle.
- Mark the conduit at the distances worked out, all from the same end.
- Bend each mark on the right bender symbol -- the arrow, the rim notch or the star -- and check the angle with a level.
- Keep every bend in the same plane, rolling the conduit half a turn between the two bends of each offset.
Common mistakes and tolerances
- Forgetting the shrink
- Without it the offset finishes past the obstruction, not at it, and the conduit hits. The shrink goes into the first mark.
- Dog legs
- If the conduit turns a little between bends, the offset comes out twisted and will not lie flat on the wall. Check with a level on top of the conduit.
- The wrong bender symbol
- The arrow is for stub-ups and offsets, the rim notch for the middle of a 3-point saddle, the star for the back of the second 90 of a back-to-back. Mixed up, the marks move.
- Measuring from both ends
- Every mark is measured from the same end of the conduit. One from each end adds the errors of both.
Frequently asked questions
- How do you calculate a conduit offset?
- The distance between the two marks is the offset depth times the multiplier for the angle: 6 at 10°, 2.6 at 22.5°, 2 at 30°, 1.4 at 45° and 1.2 at 60°. The first mark goes at the distance to the obstruction plus the shrink. A 6-inch offset at 30° with the obstruction 35 inches away has its marks at 36-1/2 and 24-1/2 inches from the end.
- What is shrink in conduit bending?
- How much shorter the conduit gets when it is bent: the angled run covers less ground than the straight one. The table gives the shrink per inch of offset -- 1/16 at 10°, 3/16 at 22.5°, 1/4 at 30°, 3/8 at 45° and 1/2 at 60° -- and it goes into the first mark so the offset lands at the obstruction.
- How do you bend a 3-point saddle?
- The middle bend at 45° over the centre of the obstruction and the two outer bends at 22.5°, 2.5 times the obstruction height each side. The centre mark moves 3/16 inch per inch of height for the shrink. With a 60° middle, the outer bends are 30°, 2 times the height away, and the centre moves 1/4 inch per inch.
- What is the take-up on a 90?
- The one cast on the bender: 5 inches for 1/2 inch EMT, 6 for 3/4, 8 for 1 and 11 for 1-1/4. The mark goes at the stub height minus the take-up, with the bender arrow on it.
- How do you bend a back-to-back 90?
- Bend the first 90 as a stub-up. Then measure the back-to-back distance from the back of that 90, mark it, and make the second bend with the star point on the mark and the hook facing the free end, keeping both 90s in the same plane.
- Which angle should an offset use?
- 30° is the most common: the multiplier is 2, easy to do in your head, and the shrink is small. For short offsets, like the one into a box, 10° or 22.5°; for deep offsets in a short space, 45° or 60°, which shrink more.
You can work out the figures right here, with no account. PDF, DXF, 3D and history take an account — free, with unlimited calculations.